Sometimes we have pictures where the background has a lot of texture and interest, such as a brick wall. But then we find that somebody put a drain pipe or electrical pipe or an electrical meter in the wrong place. Many times, these distractions aren’t as obvious when we are taking the pictures as they are after we take the picture. Below, you will find an example.
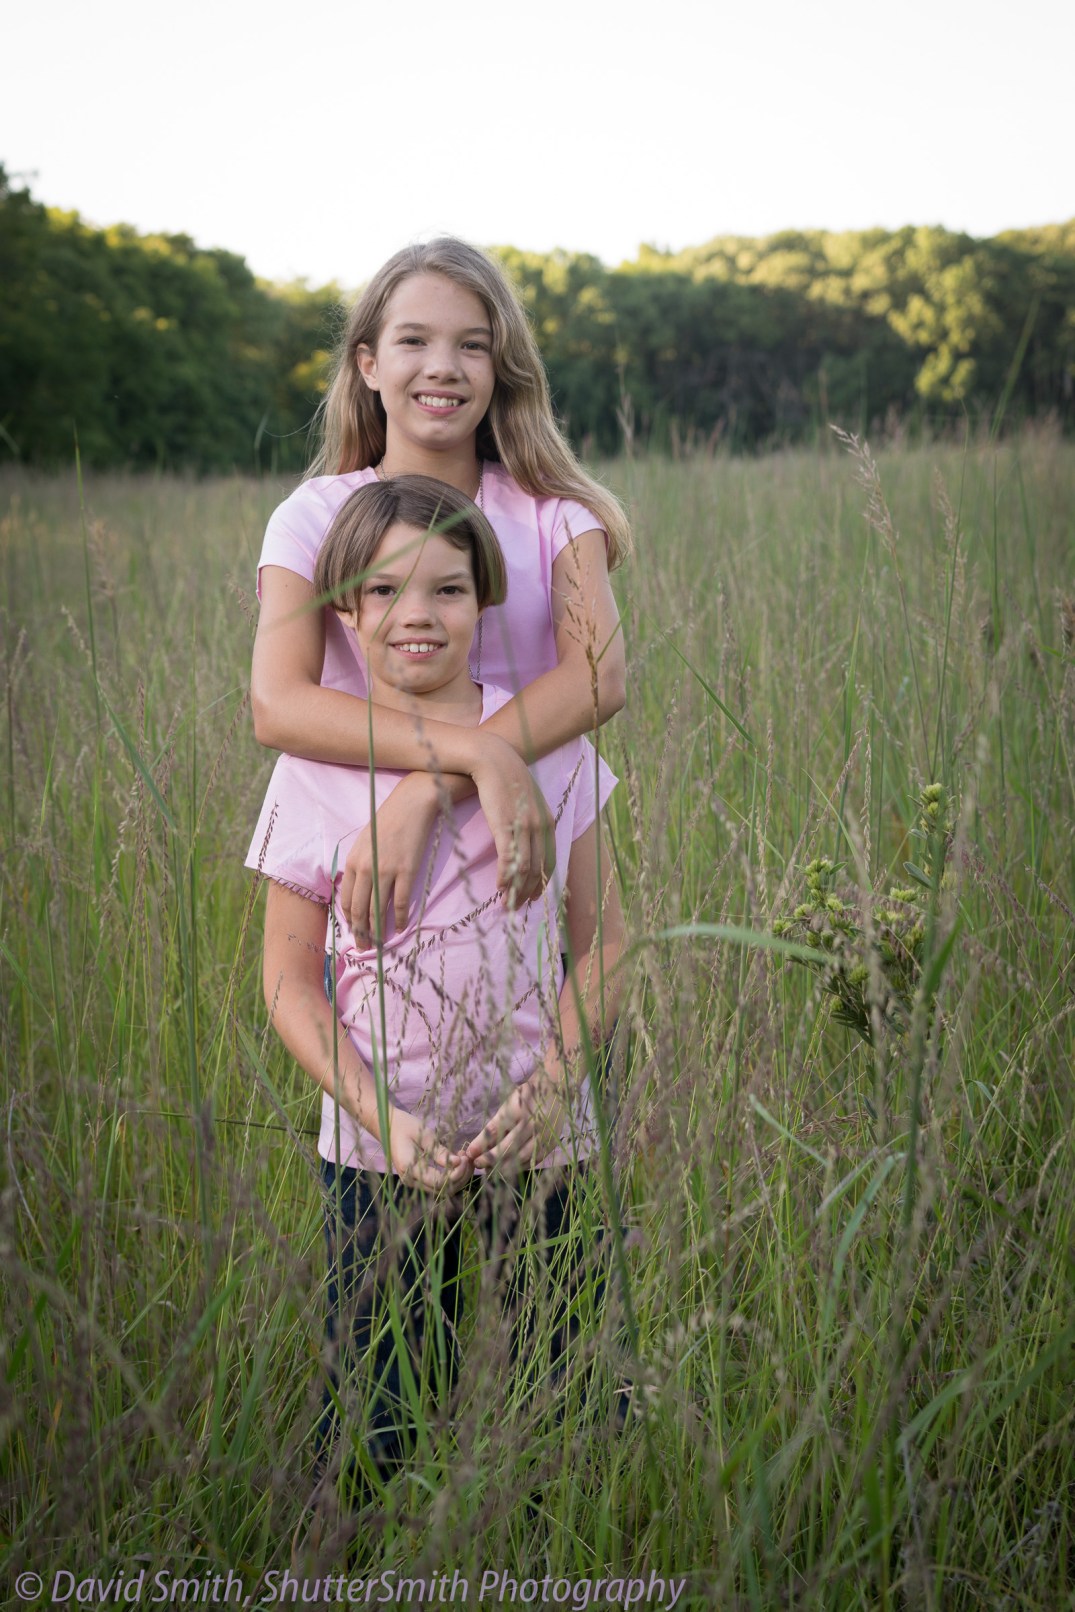
Identical twins in identical doorways! But, we have electrical conduit, electrical meter and a pesky tree. Well, yes, the cat dishes as well.
The most recent version of Adobe Photoshop makes the process of editing out these distracting elements, very possible.
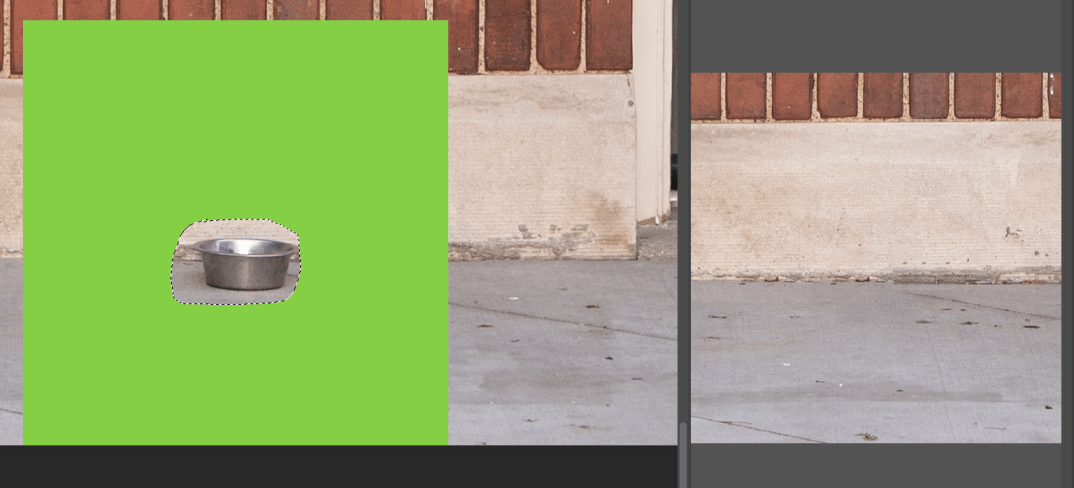
The first thing that I will show is the use of ‘Content-Aware Fill’. This worked like magic on the cat dishes, almost criminal. I selected the cat dish in the middle. Then choose the ‘Content-Aware Fill…’ menu item in the edit menu and voila it was done.
Virtually flawless removal of the disk in a few seconds.
The other three dishes worked in about the same way. The green area that you see on the left is the sampling area that photoshop used to make the fill. The green area can be increased or decreased in size to make the command more accurate. For this dish, the program guessed perfectly.
On the second dish, it didn’t work quite as well. But it was easily fixed with the ‘clone’ tool.
I selected the cat dish and selected the ‘Content-Aware Fill…’ menu item. The sample area had to be modified some because it wanted to put part of the blue shoe into the picture.
You can see a small glitch just to the left of the boot on the threshold. But, it was very easily fixed with the ‘Clone’ tool.
The third and fourth bowls were removed in a similar fashion.
Now for removing the conduit and electrical meter. This worked reasonably well. Again, it wasn’t perfect, but just a couple minutes with the clone tool and it was fine.
The default sample area is in the green. It did a pretty good job. It filled in some grey near the arch and it lost or misplaced a couple mortar joints.
Next we will do the conduit over the door on the right. This started to get a little more difficult. It didn’t work very cleanly within the arch, but ok to the left of the arch. I ended up using the clone tool a lot. This was more tedious, but it resulted in a perfectly good result.
Next goal was to remove the tree branches. The ‘Content-Aware Fill…’ didn’t work very well in the arch area. Just too many variations for it to figure out. I used the clone stamp tool. This was a lengthy, tedious, but effective method. Thankfully, brick work is never exact and a certain amount of variation is to be expected and tolerated.
I accidentally turned this picture into a black and white at one point. I am not usually a big fan of black and white. What do you guys think?
No, I’m not a police officer, asking for backup. But, you know what, for any of us who have important or critical data on our computers, it is almost as important. The sad part is that sometimes as our technology gets familiar and seems trustworthy, it can reach out and grab us by the throat.
This virtually happened to me last fall when I had a computer and a hard drive die on me within a couple weeks. Now, I didn’t loose anything of real value, because I did have a backup, but I hadn’t run it in a week or two. So, I did lose a few things of minimal importance. But, it got me thinking. I tell my clients that I will keep their photos for years. This is partially because we had some photos done of our family when our family was younger, but they disappeared during a recent move. How that happened, I have no clue, but they aren’t to be found. Now if the photographer had them in his archive, we could be saved from that disappointment. So, this prompted me to go to significant measures to assure that all of my data is backed up.
Let me talk about the pitfalls of potential backup systems.
Don’t rely on manual systems, it is always easier to forget and not do it
Hard drives very seldom give users much if any warning that they are about to die. My hard drive failure gave me no warning.
SSD drives fail as well, and they always give no warning
One extra copy isn’t enough, if your data is critical
Basics of backup
Your data isn’t really safe, unless you have three copies of the data
One of these copies should be off site, if your office is destroyed by fire, tornado, hurricane, etc., can your business survive?
If you do have a major disaster or a simple hard drive failure, how long can you afford to be out of commission while backups are restored?
Previous Computer Setup
I had a MacMini connected to a LaCie 6 TerraByte (dual 3 TB) hard drive connected through Thunderbolt 1 in a RAID 0 configuration. I also had a 3TB USB3 connected hard drive as my backup. Some of you may be thinking RAID hard drive therefore very secure. Well, RAID 0 will lose all of your data when a drive fails. However, I had become very addicted to the speed of RAID 0. After a drive in the LaCie TB1 enclosure died, I replaced the drive and restored from my backup. Some data was lost, but nothing very significant and it took me nearly 2 days to do this. Well, I survived, but I realized that I was a bit lucky that it wasn’t worse. So, I evaluated better backup options using the principles described above.
Backup Options
Use my RAID 1 hard drive as my main data source and buy an extra USB 3 hard drive to backup my data for off site storage. This could certainly work and meets the backup requirements, but I was finding the RAID 1 to be slower than I like for many of the operations that I do.
Configure the Thunderbolt drive back to RAID 0 and run 2 backups. It gave me the speed that I desire, but if one of those two RAID drives dies, I still have a couple days of reconfiguring the system again.
There is also a RAID 4 or RAID 5 that requires at least 3 drives. With this configuration, I can get the speed of the RAID 0, but if one drive dies, I can still use the RAID data. You just simply replace the bad hard drive and the data rebuilds in the background.
I didn’t expect to end up where I did, because it can be argued that it is overkill. But, I sleep well every night when I think about my valuable business and personal data. While researching RAID on the Mac, I discovered a really cool program called SoftRaid. It allows you to configure RAID 0, 1, 4, 5, and 1+0 configurations. It also allows you to setup a 3 or more disks in a RAID 1 mirror. Software RAID is much more flexible than hardware based solutions and there is minimal overhead on the computer’s CPU. RAID 5 has a little more overhead on the connection bus for similar data flows, and is capable of near SSD data flows, so I wanted to keep my main data on the Thunderbolt bus. Hardware RAID solutions require replacement disks of equal specifications. If the hardware fails, the disks probably would only work if put into an identical enclosure.
With SoftRaid, when a hard drive fails, you simply put in a new drive of equal or larger capacity and the software automatically rebuilds the RAID data. This rebuild process happens in the background and you may continue to work on your data. If an enclosure fails, I can simply move the drives to another enclosure and the RAID will continue to work. Another advantage of SoftRAID, is that it can warn you when a drive is showing signs of crashing. It isn’t 100% accurate in it’s predictions, but about 75% of the time it can predict a failure.
LaCie Thunderbolt 2 solution on the left and older Thunderbolt 1 solution on the right. This provides me data throughput of up to 600MB/sec.
For backup software I decided on using software called Carbon Copy Cloner. It is a wonderful piece of software that can be scheduled to wake up your computer, backup, and then shutdown the computer. It also does other things, but it met my automated requirements. Apple has a wonderful piece of software called Time Machine and I know many people who have been saved by it, including me. I am not a huge fan of it, because of how Lightroom works. There is a significant backup task that happens every hour that does slow my computer down and it can fill up the backup drive very quickly.
I ended up with a 4 drive RAID 5 configuration for my working data. Around Christmas, LaCie had a great deal on 6TB dual drive TB2 hard drive that I couldn’t resist.
3 single USB3 drives are mirrored in a RAID 0 configuration. One drive is always off site.
My backup drive is actually a 3 drive mirror managed by SoftRaid. Each of the drives is connected through a USB 3 interface. One of the drives always lives at my off site backup location. Periodically, every week or so, I disconnect one of the drives from the mirror, take it to the off site location, bring back the drive that was at the off site location and connect it to my computer. SoftRaid automatically re-synchs this drive with the mirror backup in about 6 minutes.
With this system, I can handle up to 4 hard drives failing at about the same time without significant data loss. One drive could fail in the RAID 5 array and 1 of the mirror drives at the same time, and my downtime would be limited to the time that it takes to replace the drives. If 2 or more of the 4 RAID 5 drives fail at the same time, I would have to go through the 1 to 2 days process to rebuild from the backup.
There are many ways to manage your backup system. But I would always recommend looking at the pitfalls of what you are doing and following the basics of backup which I outlined earlier in this blog. Believe me, when you think something can’t happen to you, it does with computer data.
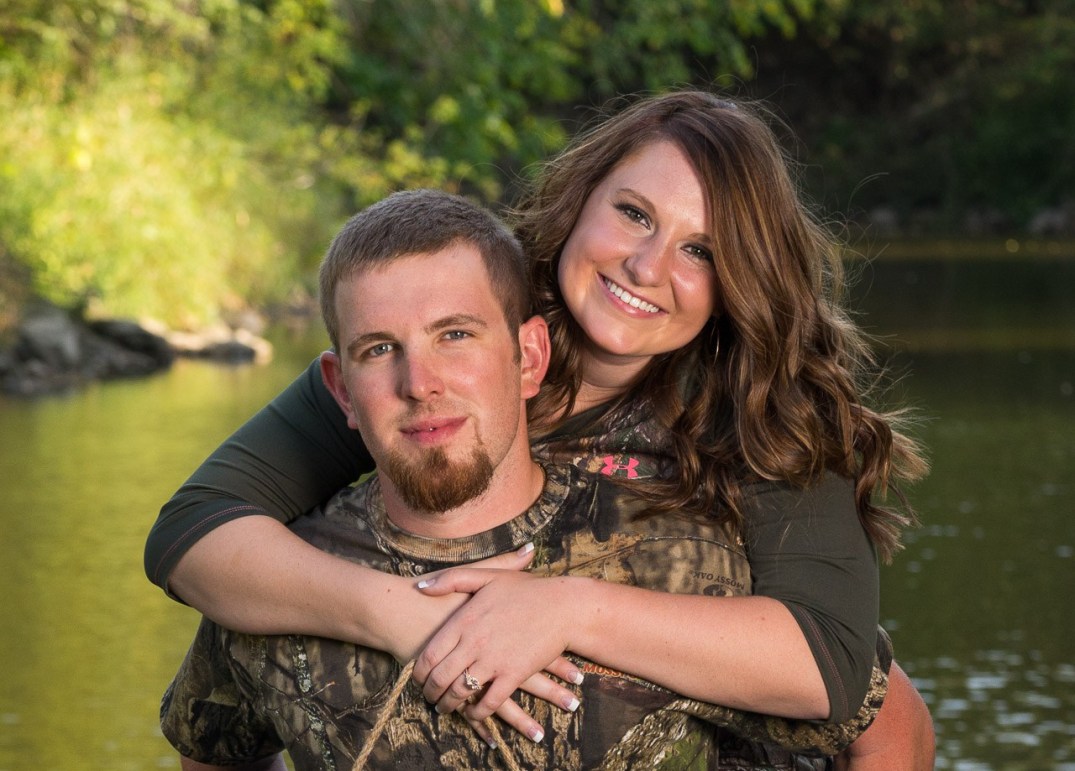
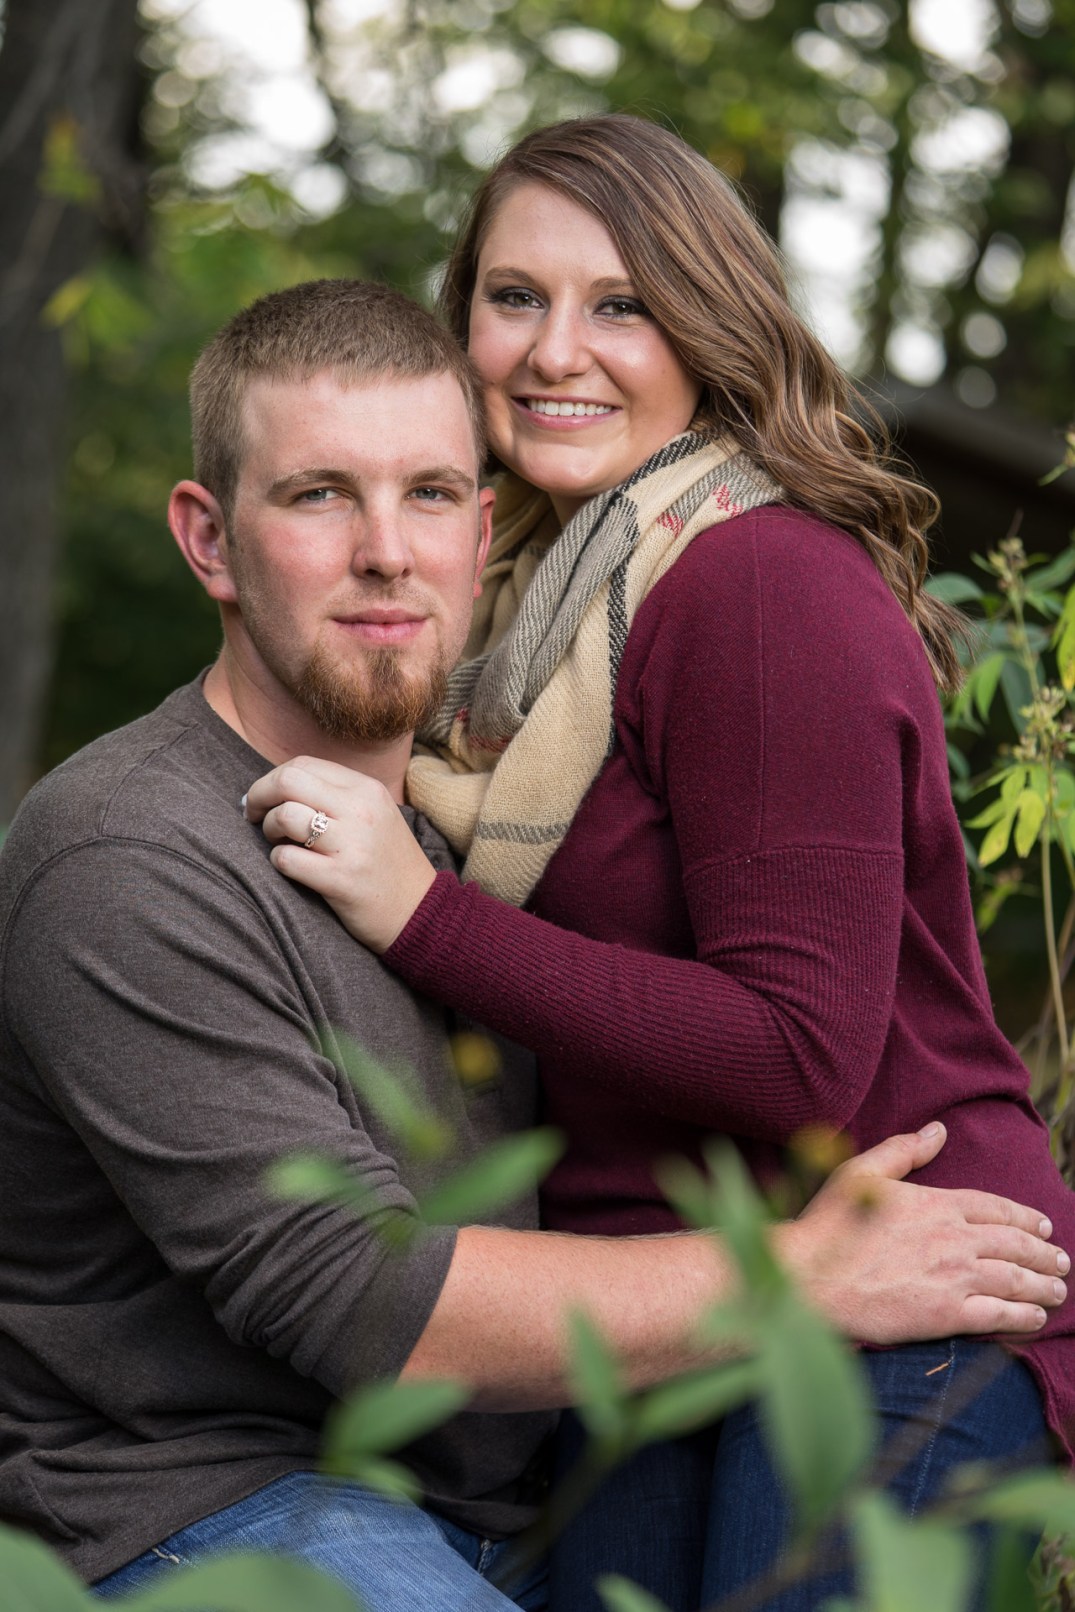
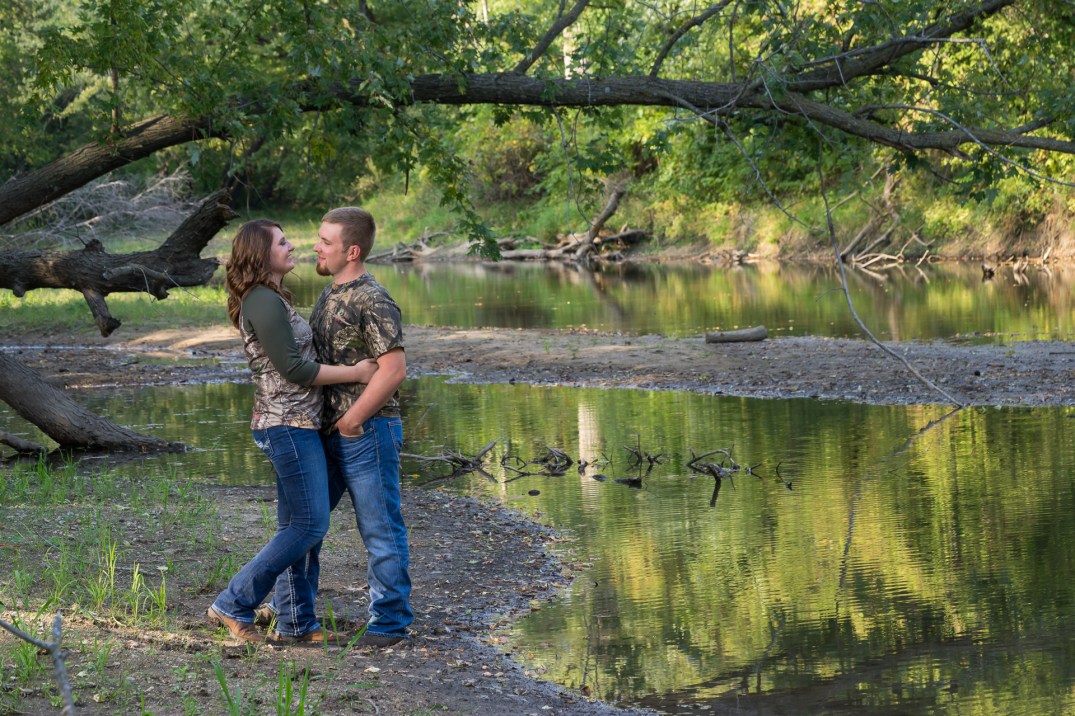
This fall, I had an opportunity to take some lovely engagement photos of Heather and her fiancé Kori. We wanted some fall like pictures, because their wedding is next fall. A week later may have been better to get some fall colors… but their were some conflicts then. This was actually one of those near record temperature September days, so the long sleeves and sweaters were warm indeed. My compliments to them for surviving the heat.
I have put some comments below the photos about what I did and why. Also some comments about what I liked. Enjoy the reading and let me know what you like or don’t like about the photos.
I used a softbox to fill in the exposure. We were in the shade and I didn’t want the background to be completely washed out. this allowed me to create a soft, but well lit subjects with shadow and highlights to build depth.This picture was taken in the bright sun. I used the sun as a back light to highlight hair and give dimension to the picture. Even though the sun was to their back, they were still squinting some. This surprised me, but I believe it was because they were looking into some brightly sun lit trees. But it is still a very acceptable picture.Heather wanted a picture of her beautiful engagement ring. The edges of the top of this fence post lead our eyes to the ring. I really like this one.I was able to capture this playful moment between Heather and Kori. It was a nice change of pace.I was able to get a little greenery to frame this shot a little. Again an off-camera flash in a softbox kept the light soft with some contouring of the face. This flash also added a catch light in the eyes to bring more attention to the face.Kori is an avid outdoor sportsman, so we needed a more ‘nature’ shot. We did have the softbox off to the left in this shot. It did help with the exposure some, but I believe another third stop or so would have been better.Heather is sitting on a very small log, but I love their expressions and exposure.We created a fun motion shot between the two of them. They definitely had fun while working on this shot.I loved this cute expression. They are an adorable couple.This is the shot that they chose for their “Save the Date” invitation. The grassy areas provided plenty of space for text.Another nature environmental shot. The softbox again was used to illuminate their faces better.Yes, the hunt is over, I believe that they are both winners!
An Acquaintance of mine, Carrie Copley, has been writing a book. This has been one of her big goals in life, and sure enough she finished the book recently. Check it out at http://www.loveyourlife2.com. Her site tells about her business and there is a link to buy the book.
I don’t like to do the simple head shots, but I always believe the picture should tell a story. In this case, I wanted to portray Carrie as a fun loving and pleasant person, but one who is also strong and decisive.
We picked a location at a local hotel with some interesting interior architecture. While we used it some, it wasn’t as useful as originally planned.
I originally picked this location because of the cool accessories such as the watering can. I tried a bunch of pictures, but none of them worked very well. This one mostly works, but it was pretty easy to eliminate as a picture for the book.I figured that I better do the standard business style head shot. It is always good to have a basic shot that the client may be expecting, or in this case, a book editor.I thought that I would try this pose, and I like it a lot. I had her cross her arms for a more power look. However, I had her position her feet so that it caused her body to not be straight, but to have more shape. This lowered her left shoulder as well and slight tilt of the head with her wonderful smile. In the end we have a feminine look with a touch of power and friendliness.More of the same in this picture. The watch isn’t reflecting as bad which helps. I believe that this is the picture that Carrie is using to promote the book.In this photo, I. eliminated the watch reflection finally.This picture was to utilize the repeating pattern in the background. It works pretty well. Carrie is using this picture on some of her social media which is cropped to around her face for small pictures.This was a similar approach as above. I wanted to use the background lights to add some interest. If there had been more lights, it may have worked better. A nice result, but not perfect.I added a kicker light to separate Carrie from the background a little more. If I would have used it more as a hair light, it may have helped more.
I wanted to hit a few additional points on why to hire a professional photographer. As I stated in my last blog, selling faster, for more money, and most of all, for you to provide the best service possible to your clients. End result, you get more listings. More money in your pocket, so that you can have a family vacation or give to your favorite charity.
I also want to demonstrate some of the differences in various levels of photography. I set up a pretty common shot, although in a somewhat difficult lighting condition. The home is an open concept with a kitchen and dining room behind and to the right of camera. So I chose this camera angle.
I will look at three levels of skill and equipment.
Using a cell phone
Using a consumer DSLR and with flash
Using a high quality DSLR with a quality lens with flash and advanced Lightroom and Photoshop techniques
Of course there are almost infinite levels between these.
Cell Phone
Here is a picture that I took with my iPhone 6s, using the HDR feature. The windows are blown out and a lot of bloom, loss of details near the windows. It doesn’t give the warm and fuzzy to make a person look at the home.
Pict 1 – iPhone 6s – HDR
Consumer DSLR
In this picture I am using my Full Frame camera which is better than a consumer DSLR cameras, but by a small amount. I am using the standard kit lens that came with the camera. I should point out that I used Lightroom to edit this shot and the iPhone shot to get as much detail and proper exposure that is possible. The bloom and colors are better, also more detail. But, with the blown out windows, it is still not very inviting.
Pict 2 – DSLR with a modified single image.
I also did an HDR image with the DSLR camera, I was able to get a better picture, because of better outside exposure. But, it was also poorer in some aspects. I might add, that my HDR work could be improved, but from what I can see, the results aren’t better, and the labor can be higher.
Consumer DSLR and using direct flash
I have seen this technique used in many local area listings. The problem with direct flash is that it leaves a very flat image. Flash will increase detail and reduce or eliminate the blown out windows. But, will leave a cold flat photo. I did a small amount of Lightroom work to reduce the ‘flashy’ look of the photo, but it is difficult to impossible to make much improvement. Also notice the shadows of the fan blades. The unnatural shadows and flatness of the image leaves a less than wow impression. I also had trouble getting the wall the correct color, which usually doesn’t happen in a direct flash… but it can. I worked pretty hard to get it close.
Pict 3 – DSLR with direct flash
DSLR, Pro Lens, Flash, and advanced Lightroom and Photoshop techniques.
Let’s first look at what a high quality lens can do. The lens takes a wider angle which will tend to make the house look bigger, but it also renders the picture better. Especially around the windows, less bloom (that haze around the windows). The first picture is with a high quality lens from a single shot. It was adjusted in Lightroom to taste. This picture is considerably better from a detail and exposure stand point that the kit lens example in Pict 2 above. But, it lacks detail, the colors are pretty good, but the windows are distracting.
Pict 4 – DSLR with a Pro Lens
Last of all, I will show you a picture of the same scene using a flash and 2 pictures blended together using Lightroom and Photoshop. You can think of it like this, if you go to a photography studio, they will use large lights and modifiers in the studio. If you take a picture outside with this same photographer, it is likely, he will bring along some of the same lights to make the natural light, even better. Conceptually, I am doing the same thing here. This picture draws you in more with the natural shadows and highlights which provide that 3D and WOW effect, but with the detail and better color of a flash. End result, yes, I want to look at this house!!
Pict 5 – DSLR with a Pro Lens, flash and advanced Lightroom and Photoshop techniques
I hope that you enjoyed this blog. While the equipment does make a difference, a Professional is thinking every day about what makes a good photo and how to improve his/her work. Your job as a Realtor is to help your clients sell their home. Just as there are good reasons for me to hire a realtor, the reasons for you to hire a photographer are just as great. Check out this gallery for more examples click here.
I ran across an interesting way to do interior photography that appeared to me to provide some great results and still be able to have control over the complete process with reasonable effort. I have a relative who does some amazing interior work. I became aware of how to do it, a few years ago, but it seemed to be just too much work for average properties that most of us think about buying. When I saw this method of doing interior work, it just clicked with me as a great way to provide value to realtors and have fun while doing it. If it isn’t fun, I am not doing it.
I will walk us through various levels of difficulty in producing interior photographs. The most simple is to simply take a picture and adjust the exposure for the interior. Fig 2 shows this result.
Fig 2 – Single Exposure for the room
This photo will work, but the windows are distractingly bright. The rest of the photo doesn’t have much punch and seems a little flat. This room has an abundance of windows, so there aren’t a lot of problems with color casts. However, it just doesn’t leave a strong feeling that I want to sit in this room and enjoy myself.
The next way of changing the photo is to add flash. Flash has good points and bad points. The good is that if used properly it can remove color casts and we can bring the exposure close to the outside, so that the windows aren’t distracting. On the bad side, flash can make the picture even more flat. It can also add distracting shadows and feel unnatural.
Fig 3 – Flash exposure
In this example, the colors are a little cleaner. But, the big take away is that the windows are well exposed. However, the photo has the flatness of flash exposure and many of the shadows are unnatural, especially the ceiling fan shadow. I also did a small amount of work to reduce the exposure of the foreground in Lightroom. You might also note that the clock in the far corner has had the glare reduced so that it can be read.
The next step is to merge these two photos together in photoshop to get the best part of each of these photos.
Fig 4 – Final Merged Image
This photo has many of the best parts of each photo. We have reflections on the floor and furniture from the incoming window light. The reflections on the back of the love seat are from 4 other windows out of the frame. We also have shadows caused by the windows and over head lights. But, most of all, it appears to be a room that I want to sit in and have as my own. Yes, it could have been staged better, but it leaves a positive impression.
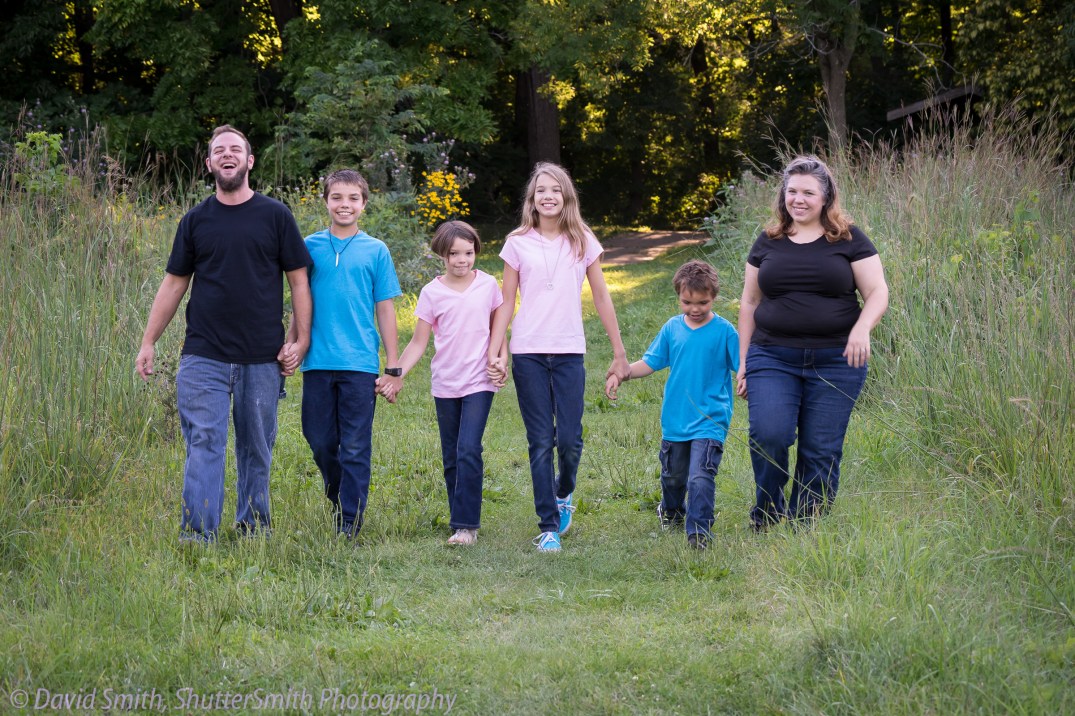
Hi, it has been a while since I posted anything. My bad. But, early this fall I had a nice time doing this photo shoot. The Bryne family is a great family that I really enjoyed being around.
As a follow up from the last blog. I thought I would get some pictures to illustrate different types of lighting. I will be looking at indoor lighting because it is easiest to illustrate each of the points.
I want to thank my daughter in-law, Joy, for being a good sport and letting me take some ugly pictures of her. I want to point out also, that she is fair skinned with freckles that are more noticeable, because she is getting lots of sun that is also drying out her skin. But she is a wonderful young lady that my wife and I are pleased to have her in our family.
The first picture is a direct flash that is mounted on the camera. This leaves a rather flat picture and an ugly shadow in the back ground.
This next picture is a bare flash with no modifiers on it and at about 45° angle from the camera. This picture looks considerably better. Still a little flat, but better. Significant shadows are seen under Joy’s chin and from her nose. But, it does show the curves of her face better. Joy’s hair over her left shoulder isn’t showing like I would like. But the ugly background shadow is gone and her face has more dimension.
Off camera direct flash
This picture is using a soft box about 26″ in diameter. It is pretty close to her, maybe 3 feet or so. A soft box located at a close distance will provide a more soft light. This picture shows more curves on the face and the hair on her shoulder is very smooth and silky.
Off Camera Soft Box about 3′
The next shot has the soft box moved away about 3 more feet. The height was about the same, so it came in and highlighted the eyes a bit more. I also think the angle was a bit more straight on Joy’s face. We have a better catch light in her eyes. The shadow under her chin is smaller due to the shallower lighting angle. But, the shadow line is a bit harder since the flash is further away and it is closer to a point source. However, it is still much softer than the unmodified flash shots. You will also notice that the background is also a little lighter now. This is also a result of the flash being further from the subject.
This shot is now with the soft box directly above the camera. It still renders very nicely, but you will notice that the nose shadow goes almost straight down and her chin shadow is more symmetrical as well. The background has darkened some since the flash is now closer to Joy again. This type of lighting can help remove skin imperfections, but in my opinion works best with a slim face and high cheek bones.
This shot was with the soft box pointed away from her. This helped make the background darker. If you look carefully, you can see that the catch light in Joy’s eyes is more like a cat’s eye. A very vertical light. This is because she was only seeing a small portion of the soft box.
For all of the other shots, I had the curtains on a window to Joy’s left closed. I then opened when I was done and used the light from the window as a fill light. The light set up was like the third shot, except the soft box was a little lower which allowed better catch lights in the eyes.
Of course there are an unlimited number of ways to light the scene. Somebody might ask about bouncing a flash off the ceiling. The ceiling can act as a giant soft box, but the angle is many times coming too straight down. There are inexpensive flash modifiers that will reflect some of the light directly at the subject when the flash is pointed at ceiling which can help. Also, bright windows can provide great soft light as well.
While we were in vacation, we came across an interesting situation, that a non-photographer probably wouldn’t even notice.
We were in Santa Cruz, California walking near the beach. The first thing that I noticed when getting out of the car, a photographer with 2 soft boxes and a couple cameras heading toward the ocean.
Young Surfers in Santa Cruz, California
We then stopped to watch some surfers for a while. Once we got past the surfers I noticed a photographer taking pictures of a dancer. She was striking various poses that aren’t normally held in dance, but they make a good photograph. This photographer was using natural light without flash.
Then as we moved on we watched another photographer that was getting a picture that to me looked like either an engagement picture or a set the date type of picture. The hard part about this was that they had a small dog with them that they obviously wanted in the picture. But, every time the photographer crouched to get the proper angle, the dog would go running to the photographer. This photographer was using an on camera flash, but holding it away from the camera with his free arm.
Young Surfers in Santa Cruz, California
I apologize for not getting pictures of these photographers, but at the time, it didn’t occur to me that this would turn into a blog post.
The question that many people might ask, which method is better?
Using the soft boxes creates as the name implies, a soft diffused light, with very gradual shadows. This is the type of lighting that is usually used in a studio or indoors. It is bulky and this photographer had several people with him carrying equipment. They were on the beach for a considerable time, but we didn’t see them, so I assume they were below us hidden by the cliffs that we were standing on. It is difficult or impossible to overpower the sun with soft boxes, so it makes perfect sense that they were taking pictures in the shade of the cliffs. When we did see them come up from the beach, they started taking pictures in a shady area a ways from the beach. The pictures that they took on the beach probably resulted in some very nice soft faces with a fairly contrasty background. The pictures in the shady area probably allowed the photographer to make his subjects considerably better illuminated with a darker but blurred and non-distracting background.
Softbox – side view
softbox – front view
The dancer pictures without flash most likely resulted in a nice environmental portrait showing cliffs, and/or breaking waves and the dancer. Contrast in the bright, although evening, sun may have been more harsh than some would like. But, for photographs of sport, gymnastics, and dance can effectively use this higher contrast.
The pictures of the couple and their dog where the photographer was holding a flash at arms length from the camera probably came out nice. The extra flash probably softened the photo some. But, if you want to have a picture of a couple walking on the beach, you really don’t have any other option (soft boxes just don’t work in full sun, until almost sunset). Holding it arms length would have a more softening effect than mounting the flash on camera.
So which is better? It depends upon what you want for an effect. The photographer with the soft boxes should have been able to create some nice pictures in the shade of the trees near the beach. The other two photographers probably created some nice pictures with beautiful ocean and cliffs in the background. Adding the flash should have softened the couples pictures a bit, which would be a nice improvement.